Neos 8.3 LTS Release
– Written by Markus Günther, Sebastian Helzle, Marc Henry Schultz
We as Neos development team have always believed that the community plays a vital role in shaping the future of the framework and CMS. Therefore, before the release, we reached out to the Neos community to understand their needs better. The team asked the community about the most requested features and the most frustrating aspects of using Neos. The response was overwhelming, with a multitude of messages pouring in. We collected all the ideas and feedback in our forum and are excited to announce that some of these ideas will be included in this latest release. We as the Neos team would like to express our gratitude to the Neos community for the valuable feedback and ideas that helped shape the latest release and as we could not implement all the feedback for 8.3, we are looking to a bright future of new Neos releases.
Table of Contents:
- Neos
- Neos.UI
- Improve node creation dialog user experience
- Document tree nodes can be opened in a new tab/window via right click
- Improve user experience for Dimension Switcher
- Rethink the distribution of @neos-project/react-ui-components
- Fully configurable plugin build stack with esbuild!
- Neos UI build stack improvements
- Flow
- Improved documentation site
- Documentation & Support
Neos 8.3 Release Highlights
One of the standout features of the release is the addition of @private props to Neos.Fusion:Component. This new feature makes it easier than ever before to calculate values for the renderer while still having access to the component's props.
To use the @private key, simply add it to a prototype based on Neos.Fusion:Component (or a derived prototype like Neos.Neos:ContentComponent) and then calculate the private value. Within the renderer, the calculated private values can be accessed using the private.myVar syntax.
One of the biggest benefits of this new feature is that it eliminates the need for various patterns that were previously used, such as nested components with @apply.props or using the "this" reference. Instead, you can now easily calculate private values within the root prototype declaration and then access them in the renderer using the private.myVar syntax.
prototype(Vendor.Site:Component) < prototype(Neos.Fusion:Component) {
    title = 'Hello World'
    titleTagName = 'h1'
    bold = false

    @private {
        computedTitle = ${String.toLowercase(props.title)}
        funnyTitle = Neos.Fusion:Value {
            value = ${props.titleTagName + " " + private.computedTitle}
        }
    }

    renderer = Neos.Fusion:Tag {
        attributes.class {
            component = 'component'
            bold = ${props.bold && 'component--bold'}
        }
        content = Neos.Fusion:Join {
            headline = Neos.Fusion:Tag {
                tagName = ${props.titleTagName}
                content = ${private.funnyTitle}
            }
            // nestedComponentScope = Neos.Fusion:Component {
            //   prop1 = ${props.title} // works
            //   renderer = ${props.title} // doest work!
            // }
      }
    }
}
Private props example
The @private key can only be defined within an original prototype declaration and cannot be overridden from outside. This ensures that the calculated private values cannot be modified from outside.
Overall, the addition of @private props to Neos.Fusion:Component is a powerful new feature that simplifies the process of calculating values for the renderer. If you're looking to take your Neos projects to the next-level or clean up existing code, be sure to give this new feature a try!
This change is a testament to Neos's commitment for improving its developer experience and making it a more efficient and developer-friendly CMS.
New commands for handling Image variants
If you're working with Neos and using image variants, you may have noticed that over time, your project can become cluttered with old or outdated variants that are no longer needed. This can lead to a bloated system.
To help solve this problem, Neos has added two new commands to its arsenal: media:listVariantPresets command and media:removeVariants command. These commands allow you to easily list all configurations for your image variants, whether they are still configured under "Neos.Media.variantPresets" or have already been deleted from this configuration.
With the media:listVariantPresets command, you can get a complete list of every single configuration for your image variants, whether they still exist or not. This provides you with a clear overview of what variants you have and allows you to make informed decisions about which ones to remove.
Once you've identified the variants you want to remove, you can use the media:removeVariants command to clean them up. This allows you to remove image variants with a provided identifier and variant name. Image variants that are still configured are removed without usage check and can be regenerated afterward with media:renderVariants.
It's important to note that this command will not remove any custom cropped image variants. However, by using these commands, you can easily keep your Neos project clean and up-to-date, without having to worry about unnecessary or outdated variants cluttering up your system.
Overall, these new cleanup commands provide an easy and efficient solution to the problem of outdated image variants in Neos. By using them regularly, you can keep your project running smoothly and ensure that you're working with the most up-to-date image variants available.
New commands for showing and listing NodeTypes
When trying to get an overview of a certain NodeType and its configured properties, it might be helpful to show the merged configuration (including supertypes) of this NodeType. For this, purpose, the nodetypes:show command was introduced:
./flow nodetypes:show Vendor.Site:Content

./flow nodetypes:show Vendor.Site:Content --path="properties.bar"
If you first need an overview of all the configured NodeTypes in the installation, the nodetypes:list command will help you out:
./flow nodetypes:list

./flow nodetypes:list --filter Vendor.Site
A new Assets Eel Helper
With the Assets Eel Helper, you can now search for assets based on their tags, their asset collections, or even a specific search term. This means that finding the right asset for your needs is now just a few simple lines of Fusion away.
For example, if you want to display all assets that have been tagged with "MyTag", you can use the following code:
assetsByTag = ${Neos.Media.Assets.findByTag('MyTag')}Better developer experience for NodeType handling
Neos 8.3 has introduced a `default` group to that can be used by all NodeTypes. The integrator still has to set the option `ui.inspector.group` but having the default group at hand should make it easier to kickstart new NodeTypes and adding new properties.
'My.Cool:Node':
  properties:
    someProperty:
      ui:
        inspector:
          group: 'default'
Moreover, Neos has resolved a problem where integrators where not allowed to set the label to a simple string - only EEL expression where allowed.
My.Node:Type:
  label: "myString"
Label with string as value
A reworked Neos.Demo site-package
With Neos 8.3 release we also include the second big refactoring of the Neos.Demo package since Neos 1.0. The demo package is always installed when you create a new project from scratch. It has always been a great source for examples, workshops and explaining features to newcomers, and it was finally time to update the code to match our current best practices and ideas.
With the demo you can:
- learn about how to structure NodeType files, their integration and rendering code
- see how a blog with articles and an overview is implemented
- learn how to use constraints to limit which content can be created in various places
- see how Tailwind & esbuild is used for the frontend build
- use it as a base to kickstart your next great project!

All Neos UI 8.3 Highlights
As we already mentioned, in the prologue, we asked the community for feedback and the Neos team went through all the feedback meticulously, considering every suggestion and idea. We would like to acknowledge and thank Paula Kallert and Manuel Meister for going above and beyond in contributing to the development process. Paula and Manuel not only suggested changes, but also took the initiative to start coding and improve the user experience for everyone.
With the new release, we improved the user experience for the integrators and editors based on community feedback.
Improve node creation dialog user experience
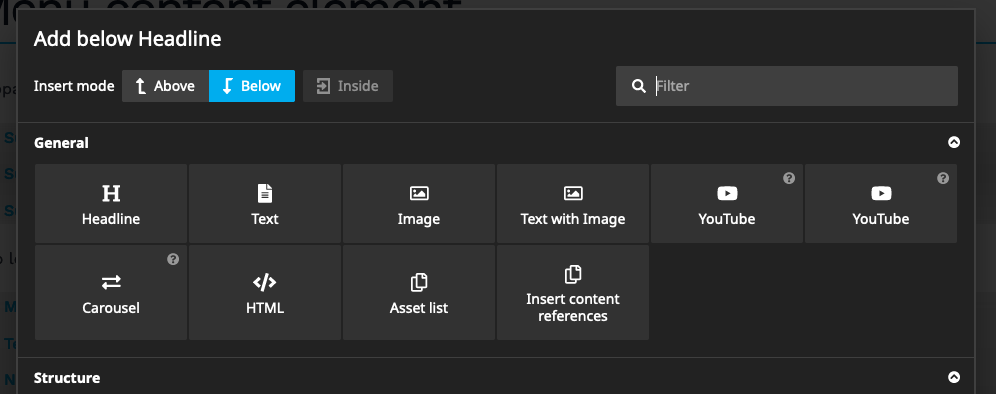
We've listened to your feedback and have made improvements to the node creation dialog. We understand that the current UX of creating a new node is sometimes not self-explanatory, especially for new users. It was unclear where the new node would be placed, causing some confusion. As part of our commitment to improving the user experience, we've made several changes to the node creation dialog:
Thanks to the community feedback and contributions, the node creation dialog has been made more user-friendly. The dialog title is now dynamic based on the insert position, defaulting to "inside" and the current node label. For example, the title would now be "Add inside Section" instead of the previous generic "Add Node". This makes it easier for editors to understand where the new node will be placed.
Additionally, the UI of the insert position has been changed to be more intuitive and user-friendly. We hope that these improvements help editors create new nodes more efficiently.

Document tree nodes can be opened in a new tab/window via right click
Editors sometimes want to work on multiple pages in parallel. For that, they open different pages in separate browser tabs. Currently, to open pages in the backend in new tabs, they have to open a new tab and navigate to the backend manually, or press "Alt" and click on the page in the tree.
To make this workflow easier, we have introduced a new feature that allows backend users to open pages with right-click and "open page in new tab". The documents in the page tree on the left side are now clickable links that can be opened in a new tab. This adjustment of an existing feature was part of the community feedback as well.
Improve user experience for Dimension Switcher
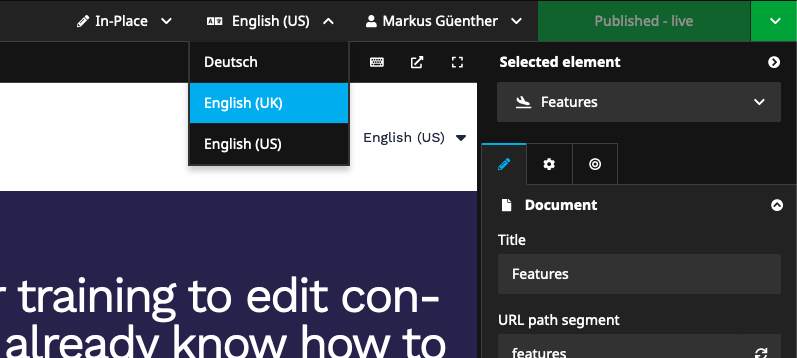
As you know, the dimensions' menu in Neos can be cumbersome and difficult to use, particularly when multiple dimensions are configured. To address this issue, we've made changes to simplify the usage of the dimensions switch, particularly when only one dimension is configured.
In the new version of Neos, you'll no longer need to open a dropdown to select another dropdown of the single dimension. This change has been implemented to make the editing process more seamless and intuitive, and we're confident that it will improve the experience for our users.

Rethink the distribution of @neos-project/react-ui-components
With the modernization of the Neos UI build stack to esbuild it became possible to make the React Neos UI components @neos-project/react-ui-components easier to use. Developers requiring the NPM package will no longer need to worry about the required CSS preprocessing from the sources (lowering nesting, applying css-modules and having the required CSS variables present).
A prepack script builds the CSS to native CSS, takes care of CSS modules and also inserts the CSS variables as hard-coded values. The distribution will also contain source maps and TypeScript typings. This means that for consumption of the components, you will only need a simple bundler to load the vanilla CSS - nothing else. For more information how to use the React components, please head over to the new README.
Fully configurable plugin build stack with esbuild!
Since experiencing the speed and power of esbuild at first hand with the new Neos UI build stack, we wanted to give Neos UI plugin authors access to the same tooling.
If you have been limited in the past by the old Webpack4 + Babel plugin build stack because you wanted to use modern ECMAScript features, another loader or configure any other setting, it is time to take building the plugin in your own hand.
We moved the Webpack specifics of @neos-project/neos-ui-extensibility to a new package, @neos-project/neos-ui-extensibility-webpack-adapter. This leaves us now only with the core code and one important new file, the extensibilityMap.json. The extensibility map can tell any bundler how to build a plugin for the Neos UI. So, our core extensibility package is now framework-agnostic. For examples of how to use it with esbuild or if you would like to learn more about the extensibility, visit @neos-project/neos-ui-extensibility.
Neos UI build stack improvements
With Neos 8.2 we migrated to esbuild and yarn3. The work on the modernization continues with this release, as we were able to further optimize the code base.
One of those tasks was clearing up half of the dependencies. We were able to remove literally 1,000 NPM dependencies by eliminating Webpack and Babel, among other dependencies!
Furthermore, we cleaned up lots of unused legacy scripts. Some of the scripts for the build pipeline could be eliminated and replaced with a more modern way. We were also able to move two pipelines to GitHub actions and created an action for automatically labeling pull requests. Additionally, we were able to hugely speed up the testing and linting.
Another big task was the cleanup of an ugly temporary necessity from the esbuild rewrite: introducing sass. But we were capable of building an alternative solution by creating our own css-modules plugin for esbuild.
We also revisited all NPM packages we publish, of whom some were not correctly released since the 8.2 refactorings. Now we also transpile them to more modern ES2020 JavaScript.
This all results in an even more snappy developer experience, of which we hope that more developers will not fear building the UI. Building the UI now takes 350ms!!!
All Flow 8.3 Highlights
Adding cache lifetime to routing MatchResult and ResolveResult DTOs
With this feature, we give a better control over routing cache lifetime with the addition of new options to the routing configuration. Previously, the routing caches had no lifetime, meaning that all entries lived forever unless a default lifetime was configured. While this was generally acceptable, some routes required different lifetimes than others.
To address this, we have added two new options, routeCacheLifetime and resolveCacheLifetime, to the routing configuration. These options allow you to configure the cache lifetime for each route individually, providing greater flexibility in managing your web application's routing cache.
As an additional option the routing configuration now allows to configure "cache.lifetime" and "cache.tags" to specify the lifetime and tags that are merged with the lifetime and tags defined by the route parts.
  -
    uriPattern: 'neos/rocks'
    ...
    cache:
      # lifetime for the cache items if no route part specifies a lower value
      lifetime: 86400
      # cache tags for the cache items that are merged with the tags from the route parts
      tags: ['marvelous']
New validators MediaType, FileExtension and FileSize
Neos Flow now includes new validators: MediaType, FileExtension, and FileSize. These validators will be able to validate both the UploadedFileInterface (FlowUploadedFile) and ResourceMetaDataInterface (PersistentResource).
These new validators provide more flexibility in validating uploaded files, making file upload management easier for web applications.
Introduce session:collectgarbage command
The introduction of the session:collectgarbage command and moving the collectGarbage method to the SessionManager provides more direct control over the cleanup intervals of outdated sessions and improves the performance of the API. We encourage all our users to take advantage of these new features and optimize their session management for better performance and efficiency.
The new command, session:collectgarbage, which removes session data and metadata of outdated sessions that have an older lastActivityTimestamp than the inactivityTimeout set in the configuration. This command is especially useful if you need more direct control over the cleanup intervals than the automatic garbage collection that happens after shutdown for a percentage of requests specified in the setting Neos.Flow.session.garbageCollection.probability.
Improved documentation site
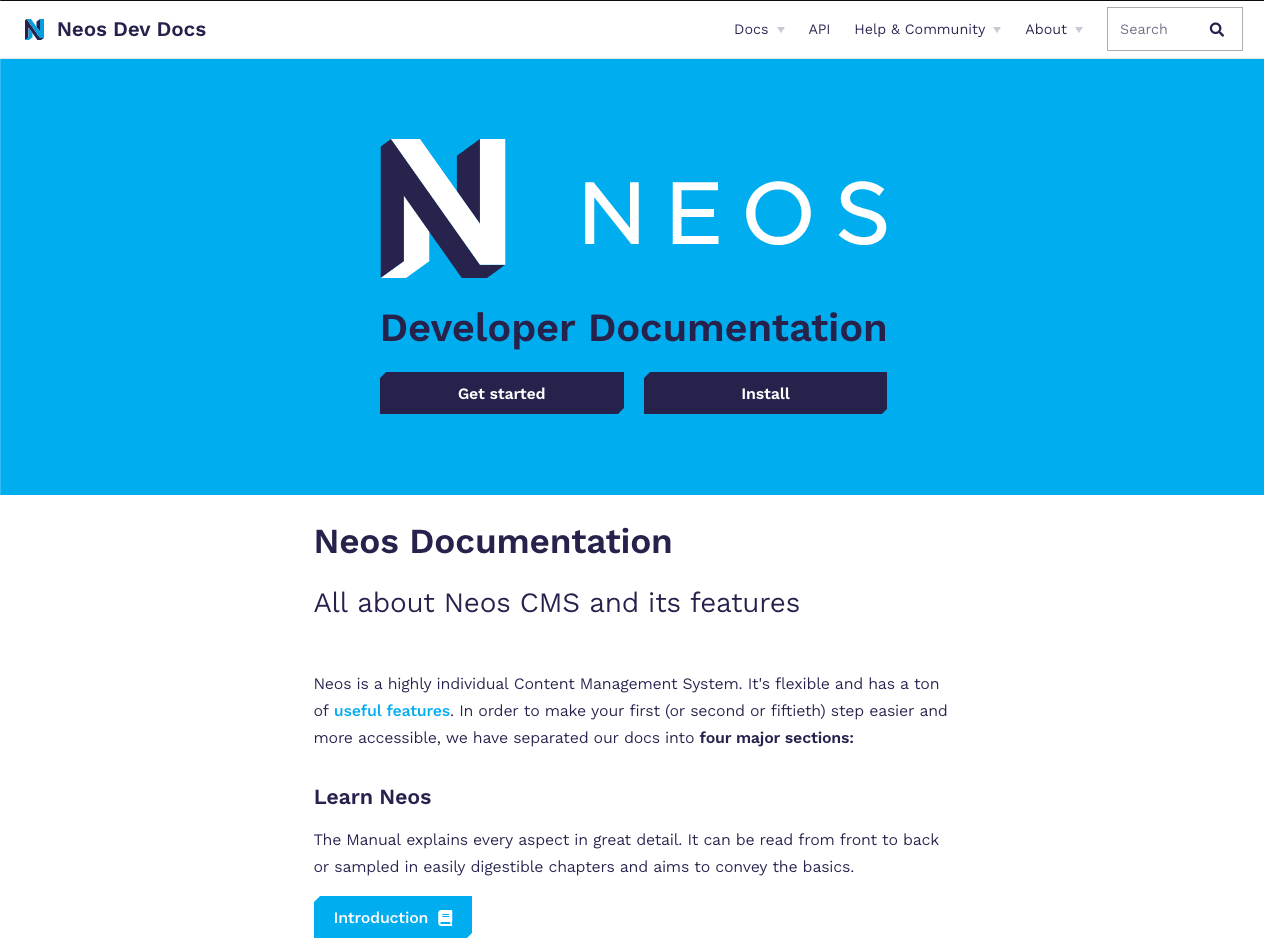
The Neos documentation website has significant changes with a redesign that improves the overall user experience. The redesign was carried out by Manuel Meister, who is a member of the Neos community, and his work is greatly appreciated.
The new design has improved visual hierarchy in the guide, with typography that is focused on making the docs easier to read. The tutorials have also been made more readable, add we have added FusionPen examples. With the addition of a sidebar filter to help users quickly find what they're looking for.
The site now has multiple different sidebars, depending on the top level being viewed, and a dynamic navigation bar that helps users navigate the site more efficiently. Additionally, a new Fusion Syntax Highlighter has been implemented, which better matches include paths, and the Eel in Fusion is now rendered like JavaScript, highlighting important variables such as props.
Finally, the website has been optimized for faster page speed, which is crucial for providing a better user experience. Overall, the changes made to the Neos docs website have greatly improved the usability of the site and will undoubtedly make it easier for users to find the information they need.

Documentation & Support
Change Logs
For the full list of changes, please refer to the release notes
Upgrade instructions
For the full upgrade instructions, please refer to: Upgrade Instructions 8.2 → 8.3
See the release notes for further information: Flow 8.3 Release Notes, Neos 8.3 Release Notes